Problem
Welcome! Whether you're new to making videos or you're an experienced content creator, this article is designed to help you with the creation of your video content.
Solution
Step 1: Prepare your content
Camtasia Editor works best when working with short, practiced content so be sure to prepare your content and your screen before you record your content. Some helpful things to remember:
- Close unnecessary background applications
- Few things can be more frustrating than working on a recording then suddenly you get a message, email, or toast notification that becomes burned into your recording!
- Few things can be more frustrating than working on a recording then suddenly you get a message, email, or toast notification that becomes burned into your recording!
- Disable desktop notifications for open applications
- Communications applications like Microsoft Teams, Slack, Microsoft Outlook, Apple Mail, and similar applications may have notifications that pop up; disabling these notifications can prevent unwanted content from being recorded.
- Communications applications like Microsoft Teams, Slack, Microsoft Outlook, Apple Mail, and similar applications may have notifications that pop up; disabling these notifications can prevent unwanted content from being recorded.
- Write a script and practice!
- One of the most time consuming and tedious tasks in video editing is removing the "uhs" and "ahs" from a recording (check out our Camtasia Audiate feature to remove aural mistakes!) and by rehearsing your content and keeping your recordings short you can eliminate a big portion of your editing time.
- One of the most time consuming and tedious tasks in video editing is removing the "uhs" and "ahs" from a recording (check out our Camtasia Audiate feature to remove aural mistakes!) and by rehearsing your content and keeping your recordings short you can eliminate a big portion of your editing time.
- Clean up your recording area
- If you're looking to record the desktop, be sure to hide desktop icons if you don't want them to be in the video.
- Make sure you have an appropriate desktop background
- Close unnecessary tabs if you're recording your browser.
These are just a few things to keep in mind when preparing your content for recording.
Step 2: Record your screen and camera
- From the Camtasia Home window, click New Recording, or click Record from an open project.
- In the Camtasia Recorder, click the Screen Recording, Camera, Microphone, and System Audio (optional) toggle buttons to turn them on.

- Camtasia highlights the selected recording area on the screen. To edit the recording area:
- Drag the handles to adjust the selection.
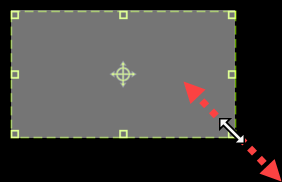
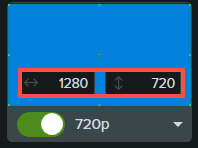
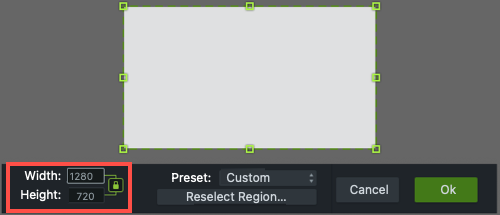
- To enter a specific size, type the dimensions in pixels into the Width and Height fields.
- To move the selected area on the screen, click the center handle (Windows) or within the selected area (Mac) and drag to the desired location.

If your computer is connected to multiple displays, you can drag the selected area from one screen to another.
- Drag the handles to adjust the selection.
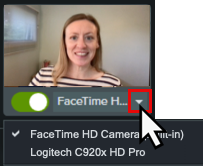
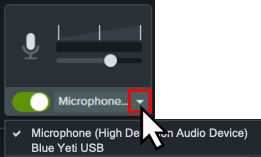
- Click the Camera and Microphone dropdowns to select specific devices.
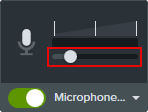
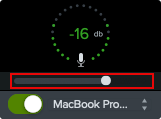
- Drag the microphone slider to increase or decrease the audio level.
- Turn system audio on or off. System audio captures the sound from your computer such as application alerts or audio playing from your computer speakers.
- Click the Camtasia Rev toggle to turn on Camtasia Rev.

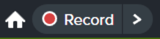
- Click the Record button or press the F9 key (Windows) or Command+Shift+2 (Mac).
- When you are finished recording, complete one of the following:
- Click the Stop button
- Press the F10 key (Windows) or Command+Option+2 (Mac).
- On Windows, click the Camtasia Recorder icon in the taskbar and then click the Stop button.
- On Mac, click the Camtasia icon in the menu bar and select Stop Recording.
To learn more about Camtasia Recorder and additional recording options, see Introduction to Camtasia Recorder.
Step 3: Accelerate your project with Camtasia Rev!
Transform your original recording from this… to this with just a few clicks in Camtasia Rev.

Rev makes it easy for creators to deliver on-trend and compelling video content. Implement your own personal style with just a few clicks.
If you have the Camtasia Rev option turned on in the recorder, Rev opens after you stop the recording.

In Rev, apply one of our professionally-designed layouts to best fit your recorded content. Choose from screen focused, camera focused, or balanced layouts.
On the Background tab, choose from a variety of colors, patterns, and animations for the background to make your content more visually engaging.
Accelerate your video creation by selecting from our recommended preset effects on the Screen and Camera tabs, no editing skills required. You can instantly preview these effects to perfect the look of your video with just a few clicks.
- Apply multiple effects to the cursor and screen recording to draw attention.
- Apply effects to the camera recording to set the tone and remove distracting background noise and visuals.
- Apply the AI Noise Removal effect if you recorded in a noisy environment.
Note: You can turn off some of the automatic selections in Camtasia Rev, such as backgrounds. Click to deselect the option on the Background, Screen, Camera, or Filters tabs.
Camtasia’s flexible recording allows you to change the layout or effects anytime. See Introduction to Rev Media.
Step 4: Using Camtasia Editor
After applying the desired look, layout, and effects in Camtasia Rev, click the Edit in Camtasia button to continue editing your recording in Camtasia Editor.
Rev offers two options for displaying media on the timeline in Camtasia Editor.

Editing Options
Select how you want to edit media in Camtasia:
-
 Rev Media (Recommended): Combines the recorded streams (screen, camera, and audio) into a single media package. This option allows you to quickly apply automated enhancements, layouts, and basic edits. See Introduction to Rev Media.
-
 Unpacked Media: Edit the recorded streams (screen, camera, and audio) as separate tracks. This option provides more editing control.
Basic Edits to Rev Media
Try these quick edits after recording to remove mistakes or to enhance your video.
Change Looks & Effects
Camtasia’s flexible recording allows you to change the layout or effects anytime.
Click the Modify button on the Rev media to reopen Camtasia Rev to quickly edit the look, layout, or effects.
Apply Different Looks & Effects to a Video Section
To apply different looks and effects to a section in your video, split the Rev media into separate clips on the timeline. For example, if you want one section of your recording to focus on the screen content and another section to focus on the camera.
- Click to select the Rev media on the timeline.
- Drag the playhead to the desired position on the timeline.

- Click the Split button.

- Camtasia splits the Rev media into two separate media clips. Click the Modify button to open the media in Camtasia Rev.
- Make the desired changes to the layout and effects selections in Rev.
- Click the Save button.
The video section is updated on the timeline with the latest changes.
Position Media within a Layout
To make adjustments to your content within a layout in Camtasia Editor, select the media stream (screen, camera, or background) in the Properties pane or edit its position directly on the canvas.

For example, center the speaker within the frame.
Or, adjust the layout if the camera covers important areas of the screen recording.
Trim
Remove any extra content at the beginning or end of a recording.
- Click to select the media on the timeline.
- Drag the end of the clip in.
- To restore content that was trimmed too far, drag the end of the clip back out.
Trimming does not affect the original recording in the media bin.
Customize an Effect or Background
Customize the effects applied in Camtasia Rev. For example, change the background color to match your brand or adjust the border width. See Customize Media & Effect Properties.
View Steps
- Click to select the Rev media on the timeline.
- In the Properties, select the screen, camera, or background stream to view and edit the effects applied in Rev.
- Double-click the effect name or dynamic properties to view the available customizations.


Add an Annotation
Annotations are visual elements and text to emphasize, direct viewers’ attention, provide additional information, or cover up areas in your video.

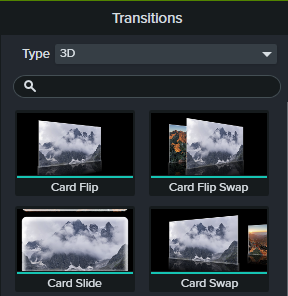
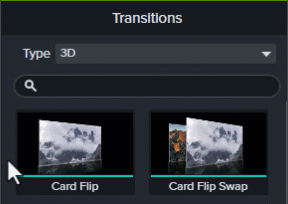
Add a Transition
Create a smooth visual transition between media. See Add a Transition.
View Steps
- Select the Transitions tab.
- To find a transition, complete any of the following:
- Browse the list of transitions.
- To filter the list of transitions, select an option from the Type dropdown.
- Enter a type or transition name in the Search field.
- Drag your cursor across the transition thumbnail to preview it.
- Drag the transition onto media on the timeline.

- The drop location on the media impacts where the transition is applied:
- Drag to the left end of the media to apply the transition to the beginning.

- Drag to the right end of the media to apply the transition to the end.

- Drag between media to apply the transition to both the beginning and the end.

- Drag to the left end of the media to apply the transition to the beginning.
- To change the duration of the transition, drag the end of the transition in or out.

Tip: Drag the Timeline slider to make it easier to select and edit the transition. - Some transitions have additional properties you can customize. Click to select the transition on the timeline and click the Properties button to view the properties available.

Remove Mistakes in Camtasia Audiate
Click the Edit as Text button to quickly remove mistakes with AI and text-based editing.

Add a Title
Add a title or lower-third from Camtasia assets to introduce your video, a speaker, or scene.
Step 5: Export your project to share with your audience!
Export a video file based on the media on the timeline in your Camtasia project. The Export menu contains settings optimized to share videos to your local hard drive, Screencast, YouTube, and more.
Click Export and select an option from the dropdown: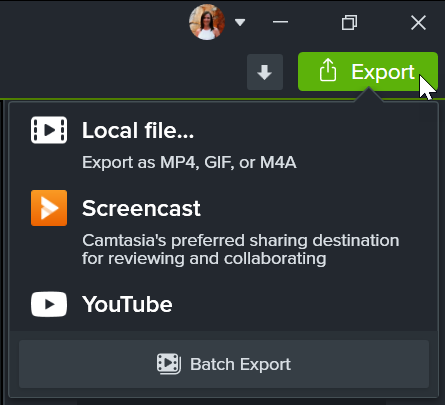
Export a Video to Your Computer
The Local File option is best for exporting a MP4, GIF, M4A, or a video with interactive features (such as table of contents, captions, search, quizzing, and hotspots) onto your computer. Then, upload to a video hosting site, your channel, or social media to share the video with others.
- Select Export > Local File.
- The Export Local File dialog appears. Customize the export options:
-
Windows: Select an option from the Preset dropdown or select Custom to edit the export settings.

- Mac: Select a file format from the dropdown and click the Options button to customize the advanced settings.
-
Windows: Select an option from the Preset dropdown or select Custom to edit the export settings.
- Click Export.
Tip: Batch export multiple videos.
Select Export > Batch Export button to quickly export a series of videos to repurpose the content to fit various platforms, video styles, or export quality requirements. See Batch Export Videos.
Export a Selection on the Timeline
Export a selection on the timeline to create a short video or to preview an effect.
Learn how to export a timeline selection
- Drag the green and red playhead handles to make a selection on the timeline.

- Export the selection:
-
Windows:
- Right-click the selection and select Export Timeline Selection As.
- The Export Selection dialog appears. Choose the desired options. If the selection includes interactive features, select the Export with Smart Player preset or file format. See Export Videos with Interactive Features.
- Click Export.
-
Mac:
- Select Export > Local File.
- A confirmation window appears. Click Continue to export only the selected portion of the timeline.
- The export dialog appears. Choose the desired options. If the selection includes interactive features, see Export Videos with Interactive Features.
-
Windows:
- Click Export.
Export to Screencast
Upload your videos to Screencast to share with your audience. Screencast is a cloud-based solution for collaboration and feedback.
Your TechSmith account automatically gives you access to store up to 25 videos on Screencast for free. Or subscribe to Screencast Pro to upload unlimited videos and access additional features. Learn more about our Screencast account tiers.
Check out some of the benefits of sharing your content to Screencast:
-
Supports Interactive Features
Screencast supports any interactive features you have included in your video, such as table of contents, captions, search, quizzing, and hotspots. -
AI-Assisted Titles, Descriptions, and Chapters (Screencast Pro)
Save time and use AI-generated titles, descriptions, and video chapters for your content. See Set Context Quickly with AI-Assisted Titles and Descriptions and Add Video Chapters. -
Auto-Generate Captions for all Videos (Screencast Pro)
Make your videos more accessible and easy-to-follow with AI-generated captions. For Screencast Pro accounts, captions are automatically generated based on the audio transcription for any videos uploaded to Screencast. See Add Captions in Screencast. -
Conversations & Reactions
Post a question to prompt feedback. Leave comments, annotations, and emojis on images or at specific times in a video. Your viewers can engage with your content without setting up an account. See Manage Conversations.
Learn how to export to Screencast
Note: You must have Camtasia Windows version 2022.4.0 or later or Camtasia Mac version 2023.0.0 or later installed.
- In Camtasia, select Export > Screencast.
- The Export to Screencast dialog appears. Enter a title and optional description.
- Click the Export button.
Camtasia uploads the video to your Screencast Library.
Export to YouTube
Upload your videos directly from Camtasia to YouTube.
Note: Recommended YouTube video resolutions vary. 720p or 1080p (HD) are best for playback on standard monitors.
Learn how to export to YouTube
- Click Export > YouTube. You may be asked to sign in to your YouTube account.
-
Enter a title, description, tags, privacy, and category.

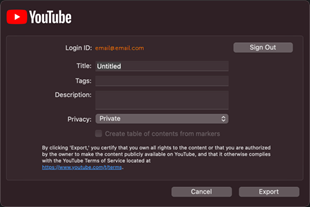
Tip: Add tags to improve improve search engine optimization (SEO).
Add keywords from your content as tags so YouTube can help users find your video.
- Set the privacy settings to the desired level.
-
Click Export.
Note: If your timeline includes captions or a table of contents:
- Windows: Camtasia 2022.1.0 and later automatically uploads your captions and TOC to YouTube.
- Mac: Select Create table of contents from markers to upload your TOC. Camtasia automatically uploads your captions to Youtube.
Camtasia uploads the video to YouTube and opens the video in a browser window for playback.
Note: Quizzes and interactive hotspots in Camtasia are not supported on YouTube.
Export Videos with Interactive Features
The TechSmith Smart Player is required for videos with interactive features such as table of contents, captions, search, quizzing, and hotspots.
Learn how to export with the TechSmith Smart Player
To include the TechSmith Smart Player, export to any of the following options:
-
Local File (Windows): Select the MP4 with Smart Player preset or file type option. On the Smart Player tab, select from these additional options:
- To report quiz results with SCORM, enable the Report using SCORM option and click the SCORM Options button. To learn more about SCORM packages, see Use Camtasia Videos in Your LMS.
- Exported vs. Hosted Smart Player Files:
For additional details about Exported vs Hosted Smart Player files, see Hosted TechSmith Smart Player FAQ.- Export Smart Player files for hosting: The export includes additional CSS and JavaScript files required to run the Smart Player on your website. As web browsers evolve, it may be necessary to manually update or reproduce video files with the newest version of Smart Player.
- Use hosted Smart Player files (Recommended): Smart Player CSS and JavaScript files are hosted and kept up-to-date by TechSmith. This option ensures you always have the latest version of Smart Player without having to manually update files on your web server or reproduce video files.
-
Local File (Mac): Select the Export to MP4 file format and enable the desired interactive options in the export dialog:
- For captions, select an option from the Caption Style dropdown.
- To include a quiz, enable the Include Quiz option and click Options to edit the settings.
- To report quiz results with SCORM, enable the Include SCORM option and click Options to edit the settings. To learn more about SCORM packages, see Use Camtasia Videos in Your LMS.
- To include a video TOC and search, enable the Create table of contents from markers option.
- Screencast
Using Videos in Your LMS
To learn how to link, embed, or export your Camtasia video as a SCORM package for use in a learning management system (LMS), see Use Camtasia Videos in Your LMS.